Red Tide 1985 Day 7 Operations Order
By Mark Gibson, converted to html by Chris Krause
Background info / Updates:
1. As referred to earlier the Recon Battle had mixed results.
Brief from Div:
Div Trace:
Additional guidance from the DIV COMD:
A couple of things:
1) I am showing the breakthrough line to the west to give you an idea of how
much terrain is left. As you can see, your objectives are with that in mind,
they are placed in the rear but they are such that the idea here is that higher
HQ is placing emphasis on the fact that terrain up to PL Knight can be
sacrificed if need be. Some enemy incursions is allowed after that. You can
probably fight down to the last vehicle here and still be "OK" on
battalion strength %, if you fight to the last along or west of PL Knight of
course. The idea is that you could give up one OBJ, then fight to the death to
prevent more than 20 ENY vehicles west of Knight, but destroy a lot of enemy
(see #2 below) and still accomplish your limit objective, or kill a lot of
enemy, hold all three objectives, but allow a penetration of Knight. Of course
all of this would not be a conscious decision at the start of the battle, but
rather a contingency plan.
2) As before you have a bonus objective to compensate for the loss of
something. This time it is destroy 60 enemy vehicles (notice it is not
"AFVs" so all vehicles count). This makes it easier to determine if
it was accomplished or not, and it is a little more generous to you I think
since you cannot not get this on a technicality for example. Higher HQ believes
that killing 60 or more vehicles will severely hurt this regiment and put it
out of the fight.
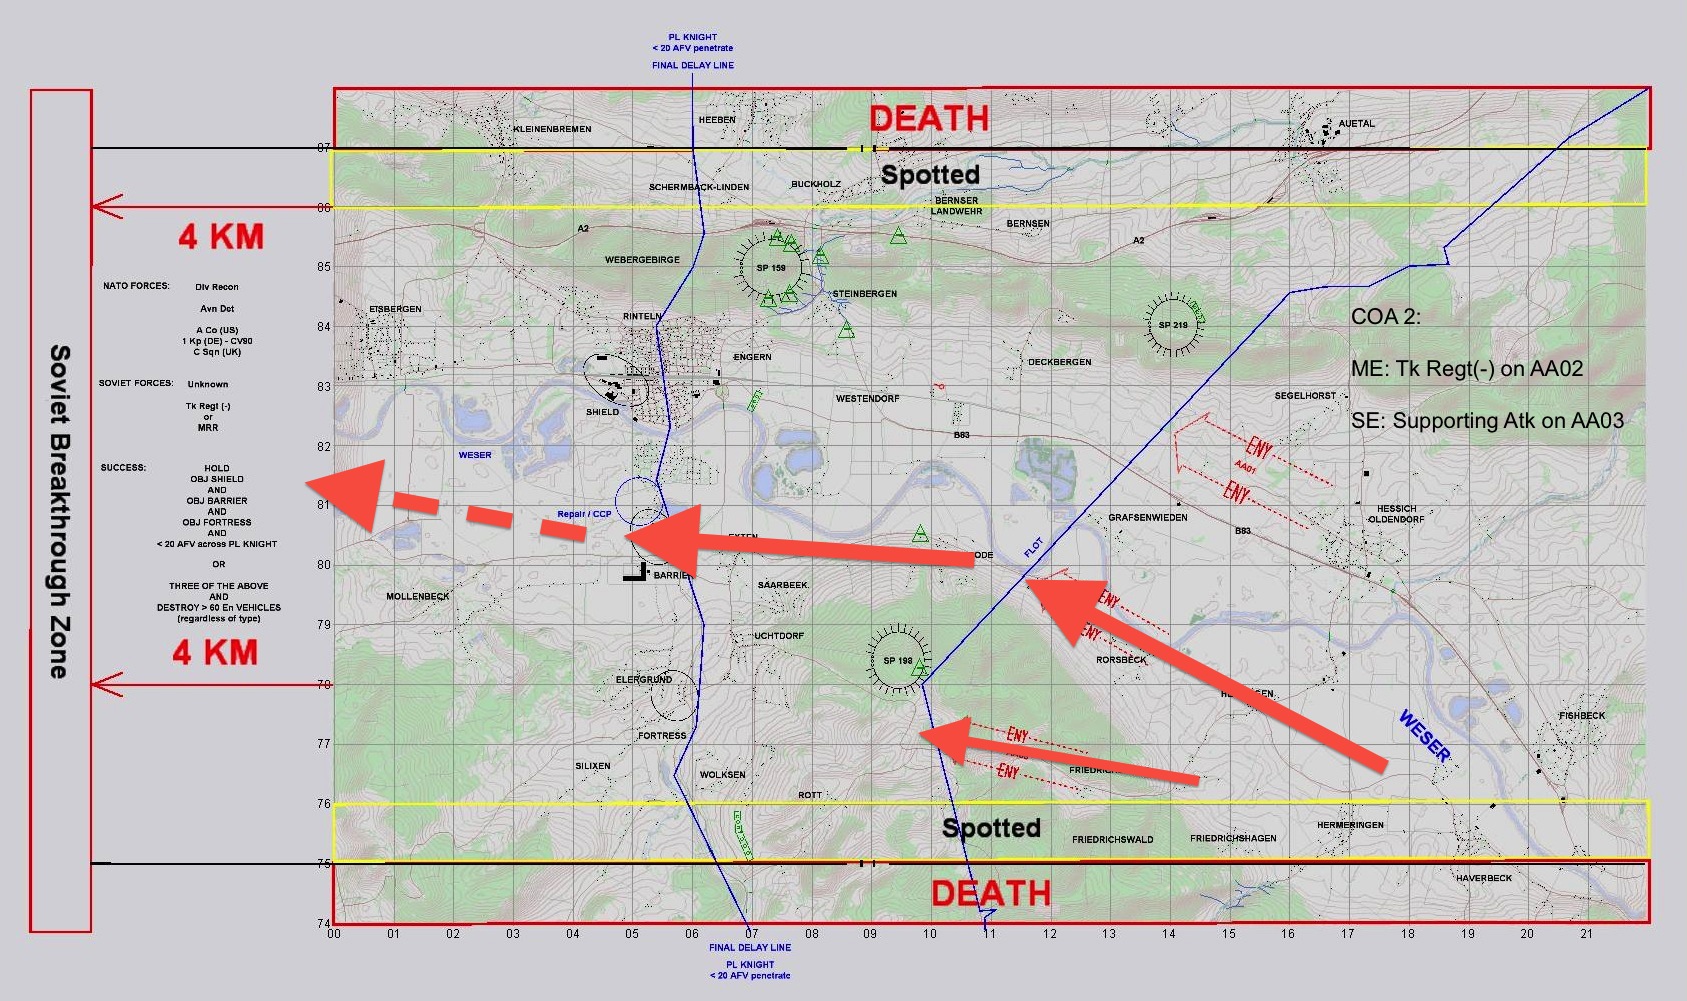
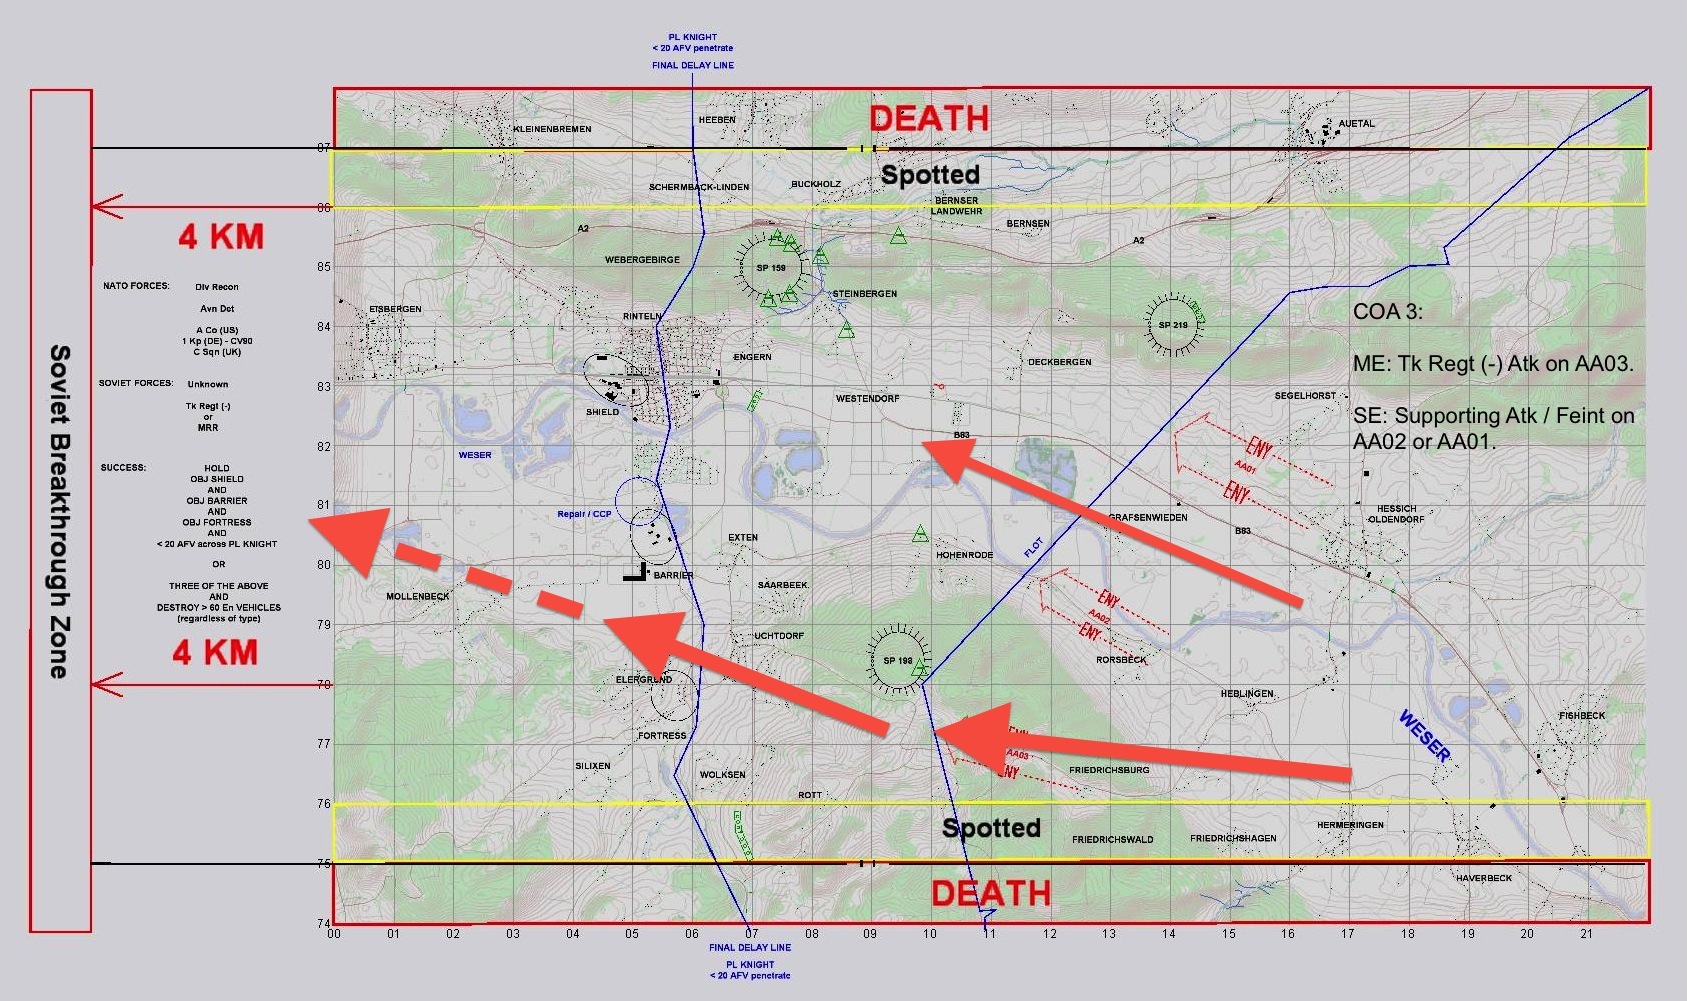
3) Higher HQ believes that the enemy may try to attack on the arrows. Highway
B83 (AA01) is an obvious high speed avenue of approach, with good fields of
fire for missiles, and south of the Weser is also good, but less of a high
speed approach (AA02). In the south at Friedrichsburg (AA03), it is much slower
going but it is unknown if the map was moved north as a decoy to attack on the
south end (this happened before). In any case AA03 could be a probe or a
secondary advance. Besides these, in the north the main highway of A2 cannot be
ignored either. The enemy may attack north then west along A2, because of the
fact that it is such a high speed avenue of approach to the west. So the best
option here is probably another forward defence/delay with mobile tank assets
in reserve ready to react. But I am sure you already know all of this.
2. OBSTACLES
We have retained some obstacles and inherited some "strong points"
(SP XXX on map) that consist of bunkers, etc. These are "fixed", so
e.g. you can't relocate the bunkers from there somewhere else.
3. GROUND
Likely Approaches:
HIDDEN VALLEY, North of SP 219
AA01 North bank of WESER.
AA02 South bank of WESER
AA03 FRIEDRICHSBURG GAP
Waterways / Bridges
The WESER bisects the AO and forms the A Co (US) / 1 Kp (DE) boundary. It can
not be forded by Tks and can only be crossed by BRDM / BTR / BMP without
bridging.
The large pool complexes (e.g. GS 1181and GS 0781) channel the enemy and reduce
his frontage.
The WESER has only four bridges in the AO:
GS: 1678 (beyond the FLOT)
GS: 0682
GS: 0582, and
GS: 0183
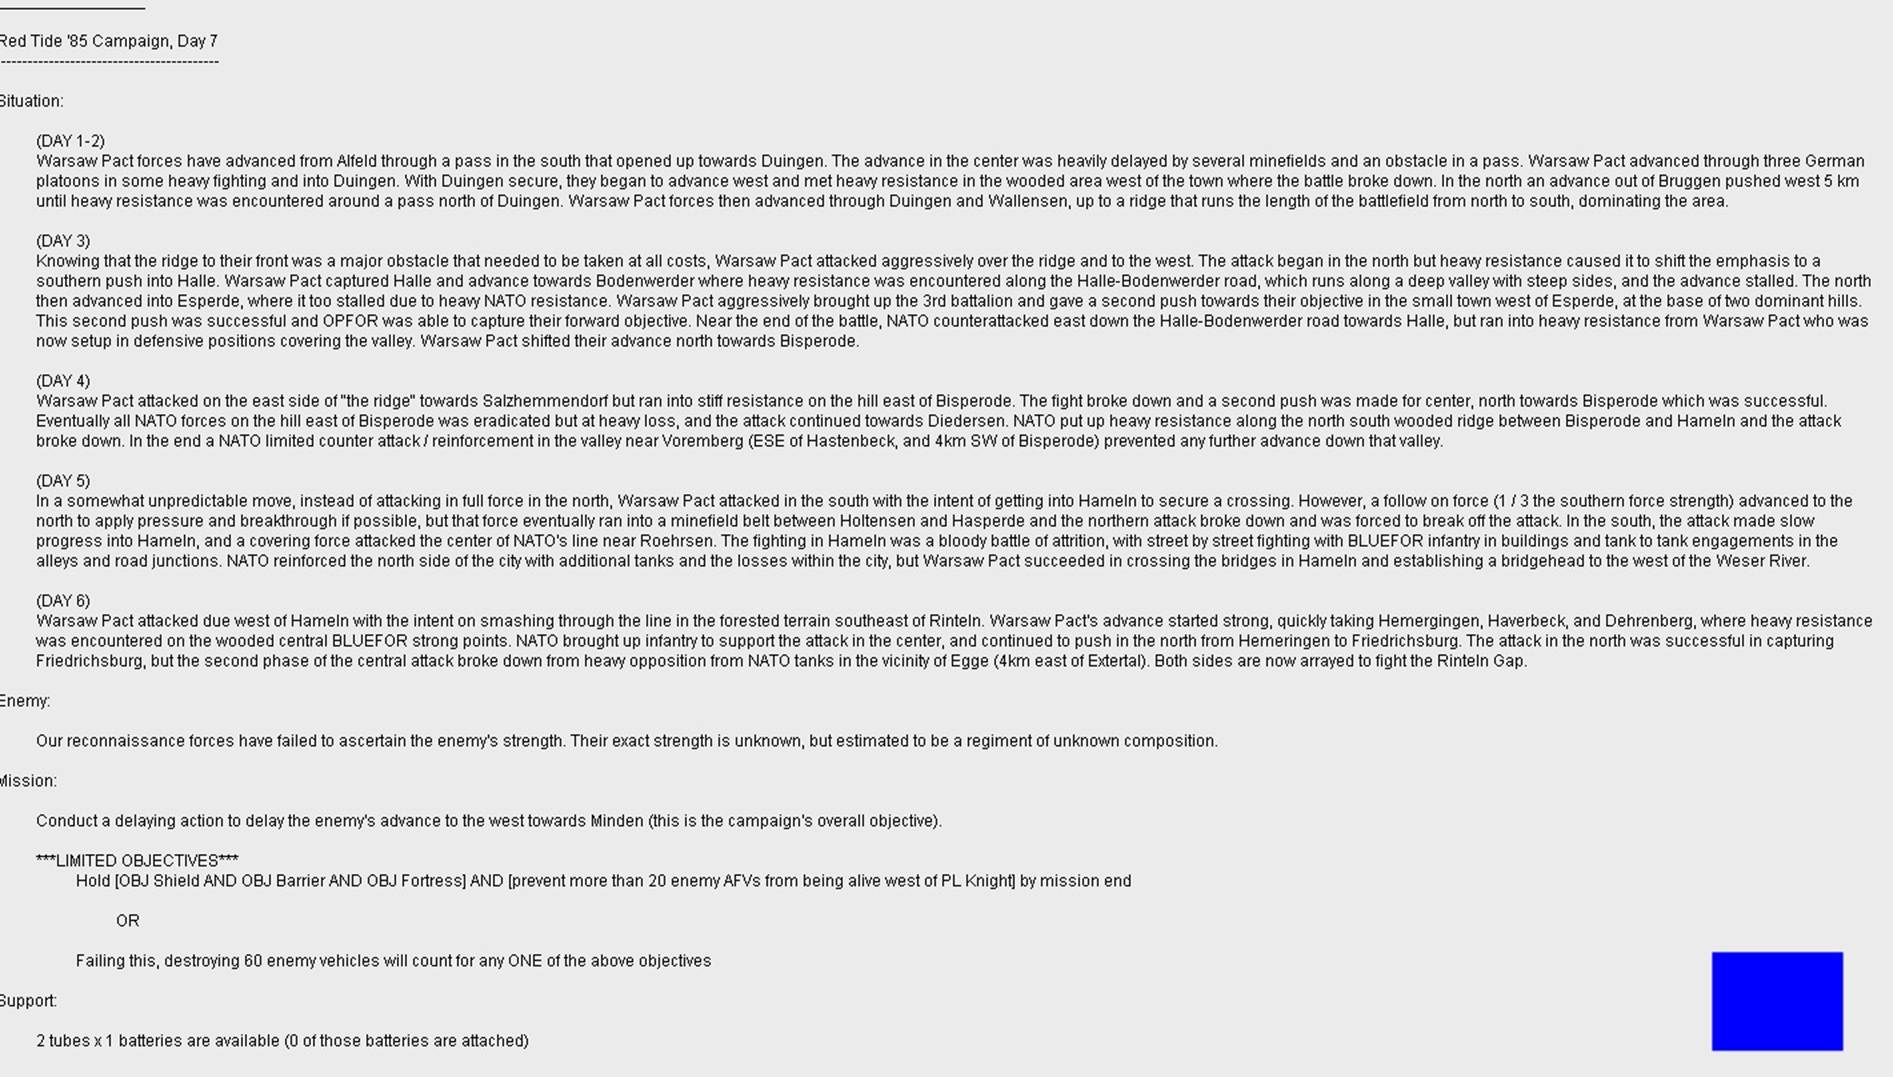
4. OBJ:
We must hold ALL of SHIELD, BARRIER and FORTRESS and prevent more than 20 AFVs
being alive WEST of PL KNIGHT by mission end.
If we destroy 60+ vehicles that will count the same as holding any ONE of the
other objectives.
HOWEVER we must achieve the initial set of Objectives as we need to maintain the
terrain buffer to the "breakout Line" (approx. 4,000m to the West of
our current map edge) and we should aim to achieve the 60+ kills as well.
http://www.steelbeasts.com/sbwiki/im...e_85-1_Map.jpg
My CONOPS:
Plan file (for recce only):
https://dl.dropbox.com/u/19518131/Re...20plan%237.sce
ORDERS
(refer Conops graphic and plan file):
Situation
- Enemy
We gained little or no knowledge of the enemy or his intent from the Recon
Battle
The Enemy has four formations to choose from for this engagement.
- Three Tk Regts of various strength 55%, 69% and 28% respectively and
- One MR Regt at 100%
I expect the Enemy to commit his "best" (69% strength) 2nd Tk Regt
here and preserve the MR Regt for the final battle in either RINTEIN or South
in the wooded area around SILIXEN
The enemy has three likely Courses of Action (COA):
- Friendly
Partial success in Recon Battle means we have no need for Battlefield replen
prior to action.
We also have extremely limited artillery support for this mission.
Mission
TF to delay within boundary in order to slow En advance
and set the conditions for NATO C-ATK
Execution-
Intent:
Must defend three primary OBJ and stop the required number of Soviet AFV from
crossing PL KNIGHT.
We will delay within zone.
Div Recon assets (ASLAV and HMMWV) will deploy fwd and provide early warning
concerning the use of HIDDEN VALLEY in the North and AA03 in the South.
FORWARD DELAY ZONE - Tank and ATGM units will impose delay BY FIRE into the
forward delay zone. Specifically EAs FLANK, CARNAGE, MORGUE and CEMETERY.
Dismounted Infantry IS NOT to be isolated and abandoned forward.
Those units will then displace.
NO unit is to die in place fwd of the FINAL DELAY LINE.
SP 219 is to be held lightly and abandoned if pressure becomes too great or in
danger of being flanked via HIDDEN VALLEY. The Infantry is there to provide
local security to the Tks . Bradleys in SP 219 and NORTH RIDGE.
SP 198 is to be held in some strength and provide the pivot point to anchor the
successive A Co (US) delay lines.
DELAY LINE X RAY
There is a prepared position in GS 1082, and GS 1083 which will provide vehicle
fighting positions and allow A Co (US) Bradleys or C Sqn (UK) to fire into EA
CARNAGE or TOW fire into EA MORGUE.
INTERMEDIATE DELAY ZONE - Tanks and ATGM units providing covering fire for
Infantry to displace to the final delay zone.
Again Infantry not to be isolated.
FINAL DELAY ZONE - Tanks and ATGM vehicles to provide long range fires.
Infantry and APCs to provide security in woods and hold SHIELD, BARRIER and
FORTRESS.
AFVs with a working weapon system are to be sited in the CCP on arrival, to be
able to fire if required.
I want us to destroy large numbers of En AFV (Priority: Arty FOs, TK, IFV/ APC)
throughout the battle.
I can accept heavy casualties if needed, but will not accept units being thrown
away.
ENDSTATE:
I want to end up no further WEST than PL KNIGHT whilst still controlling
SHIELD, BARRIER and FORTRESS.
We will have ensured that no more than 20 functioning enemy AFV are WEST of PL
KNIGHT.
General outline (strengths depicted on trace are "no less than" for
OBJ and suggested for other locations)
Div Recon Troops will provide early warning concerning the use of HIDDEN VALLEY
in the North and AA03 in the South.
A Co (US) will occupy the Northern half of the AO. Will deny by fire from SP
219, NORTH RIDGE and Line X RAY through various delay lines into EAs FLANK,
CARNAGE and URN. They will occupy SP 159. They will BLOCK the defile East of SP
159. They will SECURE SHIELD.
1 Kp (DE) will occupy the Southern half of the AO. Will deny by fire from FLOT
back to the FINAL delay line through various delay lines into EAs MORGUE,
COFFIN and CEMETERY. They will occupy and DEFEND SP 198. They will DENY the
CENTRE ridge. They will SECURE BARRIER and FORTRESS.
C Sqn (UK) will reinforce A Co (US) and 1 Kp (DE) and provide the TF Reserve to
destroy forces that cross PL KNIGHT.
Groupings and tasks:
Div Recon
Attached: 8 x Recon veh, allocated along national lines to A Co (US) and 1 Kp
(DE).
Detached: Nil
Tasks: -
- Occupy ground in RECON Zone.
- Provide early warning of use of HIDDEN VALLEY.
- Provide early warning of use of AA03.
- BPT engage targets of opportunity.
A Co (US)
Attached: 1 x Tk TP and 1 x Mech PL from C Sqn (UK)
Detached: Nil
Tasks: -
- OCCUPY Northern half of AO.
- DENY by fire from SP 219, NORTH RIDGE and Line X RAY through successive delay
lines.
- DENY the NORTH ridge.
- DESTROY Enemy in EA FLANK
- DESTROY Enemy in EA CARNAGE
- DESTROY Enemy in EA URN
- OCCUPY SP 219 with dismounts.
- OCCUPY SP 159 with dismounts.
- OCCUPY SHIELD.
- OCCUPY Line X RAY.
- DEFEND SHIELD (min PL)
- DEFEND SP 159 (min PL)
- BLOCK the defile East of SP 159
- DENY infiltration beyond PL KNIGHT.
- BPT ABANDON SP 219.
- BPT ABANDON SP 159.
- Link in with 1 Kp (DE)
- BPT to drop your Infantry and use the Bradleys somewhere else.
- Again strengths and location of delay lines open to discussion.
- SPs are NOT objectives, we can lose them.
- SPs have vehicle scrapes / bunkers that may or may not be useful.
- BPT move off SP 219 quickly if in danger of being flanked via HIDDEN VALLEY.
- BPT discuss allocation of priority fires (remembering how little we have of
it).
- If you deploy your Challengers fwd, BPT to bring them back early. Maybe
better to have them in Line X RAY.
- Don't lose your BFVs / APCs needlessly.
- Dismounted Infantry IS NOT to be isolated and abandoned forward.
- Use your vehicle smoke!!!
1 Kp (DE)
Attached: 1 x Tk TP from C Sqn (UK)
Detached: Nil
Tasks:
- OCCUPY Southern half of AO.
- DENY by fire from HOHENRODE RIDGE, SP 198, CENTRE RIDGE through successive
delay lines.
- DENY CENTRE RIDGE
- DESTROY Enemy in EA MORGUE
- DESTROY Enemy in EA COFFIN
- DESTROY Enemy in EA CEMETERY
- DELAY in INTERMEDIATE DELAY ZONE.
- DELAY in FINAL DELAY ZONE.
- OCCUPY SP 198 with dismounts.
- DEFEND SP 198 (min PL).
- OCCUPY FORTRESS initially with Log elm.
- Log elm to displace West, once PL occupies FORTRESS.
- DEFEND FORTRESS (min PL).
- DEFEND BARRIER (min PL).
- DENY infiltration beyond PL KNIGHT.
- BPT ABANDON SP 198.
- Link in with A Co (US)
- Again strengths and location of delay lines open to discussion.
- SPs are NOT objectives, we can lose them.
- SP 198 has vehicle scrapes / bunkers that may or may not be useful.
- BPT discuss allocation of priority fires (remembering how little we have of
it).
- Don't lose your IFVs needlessly.
- Dismounted Infantry IS NOT to be isolated and abandoned forward.
- Use your vehicle smoke!!!
C Sqn (UK):
Attached: Nil
Detached: 1 x Tk TP and 1 x Mech PL to A Co (US), 1 x Tk TP to 1 Kp (DE)
Tasks:
- Man units detached to A Co and 1 Kp.
- Form TF RESERVE with TP(+).
- Sight TF RESERVE on South side of WESER (vicinity GR 070790)
- BPT to spt fire into EA COFFIN.
- BPT to spt fire into EA CEMETERY.
- BPT to spt defence of BARRIER.
- BPT to spt defence of FORTRESS.
- BPT DESTROY AFVs that cross PL KNIGHT.
- Link in with both Infantry units.
- DISPLACE early and often.
- Engage at range.
- Use your vehicle smoke!!!
Aviation:
1 x AH-64:
- BPT FIX enemy while ground forces react.
- BPT Conduct C-PEN tasks
- BPT Mop up AFVs penetrating beyond PL KNIGHT
- BPT ENGAGE targets of opportunity
2 x CH-47 BPT:
- Insert dismounted elm.
- Relocate other dismounted elm.
Fires:
We have 5 x Priority fires.
We have 1 fire unit of two tubes.
DO NOT rely on indirect fire.
Obstacles:
As marked.
Air:
We have two air defence units, so keep an eye open for En helos.
We have some friendly rotary wing aviation (attack and lift) as detailed above.
AH-64 can refuel but not re arm.
Admin and
Log
No need for "battlefield replen"
US and DE Coys will have a M88, a Medic and an Ammo truck allocated.
DE Log elm need to maintain an initial presence in FORTRESS
TF will hold a Log Reserve (M88, additional trucks, Bridges, etc.).
Repair / CCP point is well forward, need to ensure tks and AFV can help defend
location when they are "unhitched".
Will hide guns in some sh*t country (possible GS 0177)
Check you ammo regularly and bomb up when you can.
Be aware the lack of bridges will constrain the Logistic effort.
If being recovered - get off the vehicle (NOT in any view - F6, F7, F8 or F9).
Command and Sig:
US Command list in effect as advised earlier (CO Brun / XO Dta Delta today).
Whisper lists as before.
Command group (Myself, Krause, 12Alfa, Kingtiger, National CO's and National
2ICs / XOs).
Understand that 12Alfa will not be here.
Understand Krause may not be available.
All others in internal channels.
Have your succession plan sorted.
ARE THERE ANY QUESTIONS / COMMENTS?
Will be on TS from H-60 for discussion
WE MUST PREVAIL TODAY.
We MUST keep them FORWARD of PL KNIGHT.